Snom - HTTP Provisioning
Handset Provisioning via HTTP Server
This is a simple guide on how to enable uaCSTA on Snom handset and Mondago assumes no liability resulting from any omission or inaccuracies in this document.
Important! Snom firmware version 8.7.3 and onwards, support CSTA via HTTP and uaCSTA (via SIP).
Snom:Model 821-SIP-Firmware 8.7.5.15
Snom provisions their handsets via HTTP Server. First, using your text editor of choice e.g. Notepad, Wordpad etc., create a configuration file called "SnomXXX.xml" where xxx is the model type of the Snom handset e.g. Snom821.xml.
Example of a "SnomXXX.xml" configuration file
#INCLUDE:UASNOMH1
Important information when creating a new "SnomXXX.xml" file
- You can create a new file from scratch, with only the new settings that you want to add.
- Or you can export "Settings" and add to that XML file. If you export the values, it will be a complete configuration minus any passwords, which are not exported. To export the configuration go to Status -> Settings -> and click "Click here to save the settings in XML format".
- It is recommended to use the highest identity number on the Snom handset, when configuring uaCSTA.
- This configuration file will create a secondary "SIP" account which will point directly to the uaCSTA Server instead of the PBX platform. See "Snom Configuration Guide [on "X" platform]" on how to configure a Snom handset on "X" platform. As a minimum an administrator must enable csta_control and enter in user_realname, user_name, user_pass, user_host and user_outbound.
Parameters Description
| Parameter | Description |
|---|---|
| csta_control | Enable/Disable CSTA. This option allows remote control of the phone via CSTA protocol. |
| csta_challenge | This setting enables/disables the challenge of incoming sip requests on CSTA sessions like INVITE and INFO. If enabled and no user_pass or user_hash has been provided the request will be rejected. 0 -Disabled, no challenge at all. 1 -Only the initial incoming CSTA INVITE will be challenged. 2 -All incoming SIP requests for CSTA sessions will be challenged. |
| csta_legacy_control | Seehttp://wiki.snom.com/Settings/csta_legacy_control |
| user_active | This identity can be disabled by disabling this option. This means this identity is no longer registered anymore. |
| user_realname | Set the name you would like to associate with each line, e.g. "John Smith". This information is also sent out to any party you are calling. |
| user_name | |
| user_pass | This is the password to be used for challenge responses. In order to protect them from unauthorized use, passwords are not displayed in their true form, but as a series of asterisks. * |
| user_host | Specify the IP or DNS address of the registrar/proxy where you want to register this account. After a successful registration, the registrar knows how to reach this specific identity and can route requests (e.g. incoming calls) from other registered parties to this phone. |
| user_outbound | Specify the outbound proxy in this field (format: addr:port) to ensure all SIP packets are sent via the specified communication point. |
| hide_identity | Setting this to "true" will make the identity disappear from the idle-screen. On 870 this will remove the identity from "Outgoing Identity" menu (the one accessible from springboard, not via settings menu). This setting depends on is_voice_identity - when that setting is disabled, the identity will automatically be hidden. |
*UC Server builds above 3.2.0.18449 the server will no longer validate the uaCSTA password and this field can be left blank.
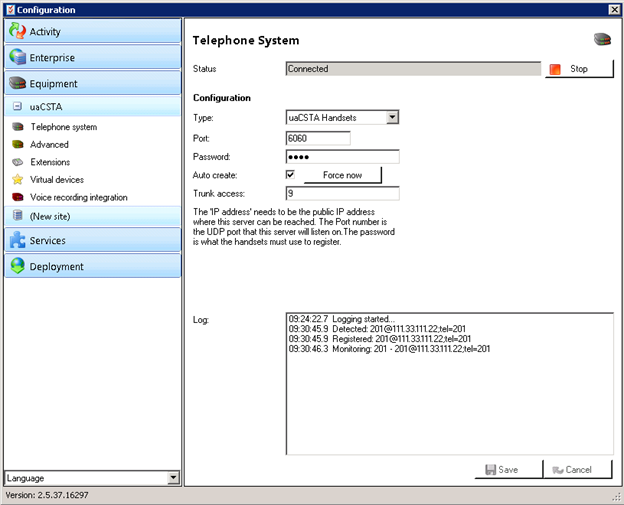
In order for a handset to import this new "SnomXXX.xml" configuration file, you must copy it to the root directory of the HTTP server and navigate back to the handset's web interface. Then go to Setup -> Advanced -> Update -> Settings URL and enter the URL "http://ServerAddress/FolderName/SnomXXX.xml" e.g. http://10.0.0.123/Snom/snom821.xml then click on "Apply" and then reboot. Once the phone restarts it should load the new settings from the XML file and you should be able to see on the uaCSTA server log a new Snom device being detected and registered.
Example

Scenario with a Multi-tenanted Server
It is common for uaCSTA handsets to be used in a multi-tenant environment. As such Mondago have designed the server software to allow auto-creation and auto-allocation of the handsets to a suitable tenant on the server. To fully use this functionality, "Tenant licenses" must be present on the server. If the tenant ID is not explicitly specified on the PBX platform and is not included within the handset configuration file, then in order to assign an extension to a specific tenant an administrator will have to edit this line of code:
#INCLUDE:UASNOMH2
Example of a "SnomXXX.xml" configuration file in multi-tenanted scenario
#INCLUDE:UASNOMH3
When creating and importing a new "SnomXXX.xml" file in the multi-tenanted environment, the principles are exactly the same as per example above.
NOTE:Please note that if the tenant already exists on the uaCSTA server then the extension number/name will be assigned against this tenant. If however the tenant does not exist, this command will trigger the uaCSTA server to create a new tenant which will bear the name specified in the command above. In this example the tenant ID would be "AcmeLab1".

 Report this page