Yealink - Manual Provisioning
Manual Handset Provisioning
This is a simple guide on how to enable uaCSTA on Yealink handset and Mondago assumes no liability resulting from any omission or inaccuracies in this document.
Yealink:Model T46G-Firmware 28.80.0.108
Each of the numbers in the firmware has a significance. The first number is the model number. There is no specific pattern (i.e. 28 = T46, 29 = T42, 31 = T19, 32 = T32). The second number is the version number. Version "80" is the first version. The third number is the customized number (anything except 0 or 1 means it for a specific customer). The fourth number is the revision number.
Important!It is recommend to use the latest available firmware. Always check with the Yealink supplier which models and firmware fully support uaCSTA. Although earlier versions support uaCSTA, we recommend version "80" or later as the version to use.
To enable uaCSTA on Yealink handset, an administrator will have to create a secondary "SIP" account which will point directly to the uaCSTA Server instead of the PBX platform. See "Yealink Configuration Guide [on "X" platform]" on how to configure a Yealink handset on "X" platform. As a minimum an administrator must enter in: Label, Display Name, Register Name, Username, Password, Server Host and Server Host Port. It is recommended to use the highest account number on the Yealink handset, when configuring uaCSTA.
Parameters Description
| Parameter | Description |
|---|---|
| Label | It configures the label to be displayed on the LCD screen for account X. |
| Display name | It configures the display name for account X. |
| Register name | It configures the username for register authentication for account X on the uaCSTA Server. |
| Username | Specifies the identity of the handset for registering on the uaCSTA server. |
| Password | CSTA password must also be specified to match the value on the 'Telephone System' page (on the uaCSTA server). * |
| SIP Server Host | It configures the IP address (or domain name) of the uaCSTA Server 1 for account X. |
| SIP Server Host Port | It configures the port of the uaCSTA Server for account X. |
*UC Server builds above 3.2.0.18449 the server will no longer validate the uaCSTA password and this field can be left blank.
Example of an account configuration for uaCSTA
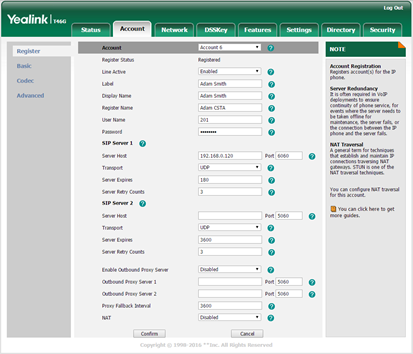
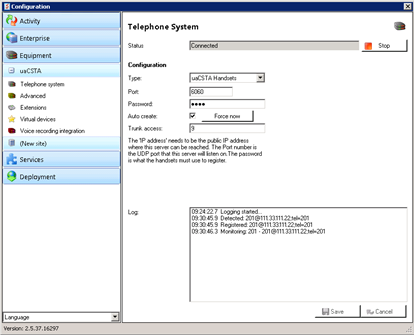
Once the new account has been set and configured hit the "Confirm" button. After applying the new settings, the phone should automatically reboot itself (if it does not, please reboot it manually). If the connection to the server has been established, administrator should be able to see on the uaCSTA server log a new Yealink device being detected and registered.
Example
Scenario with a Multi-tenanted Server
It is common for uaCSTA handsets to be used in a multi-tenant environment. As such Mondago have designed the server software to allow auto-creation and auto-allocation of the handsets to a suitable tenant on the server. To fully use this functionality, "Tenant licenses" must be present on the server. If the tenant ID is not explicitly specified on the PBX platform and is not included within the handset configuration file. In order to assign an extension to a specific tenant an administrator will have to edit this line of code on the Yealink configuration page:
Username=TENANTNAME*EXTENSION
Example:Username=AcmeLab1*201
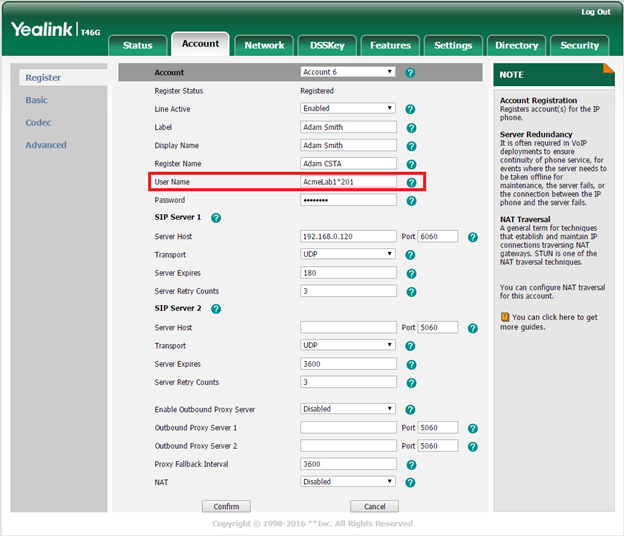
NOTE:Please note that if the tenant already exists on the uaCSTA server then the extension number/name will be assigned against this tenant. If however the tenant does not exist, entering data in this format into the "Username" field will trigger the uaCSTA server to create a new tenant which will bear the name specified by you in the "Username" field. In this example the tenant ID would be "AcmeLab1".
Edit Configuration File-Manual Export/Import of configuration file
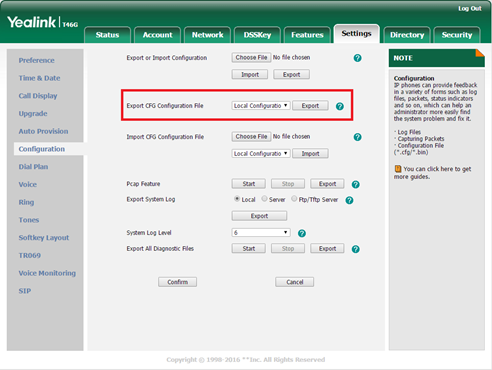
You can export "Local Configuration" file via web interface:
- Go to Settings -> Configuration.
- Under "Export CFG Configuration File" section, select from the dropdown menu "Local Configuration" and click on "Export".
- The file will be saved in the following format "MAC-local.cfg" where MAC is the MAC Address of the Yealink handset e.g. "01234567ABCD-local.cfg".
Assuming that a handset might have been previously configured, this is an example of what the "Local Configuration" file would look like:
Example of a "Local Configuration.cfg" file
#!version:1.0.0.1
sip.user_agent_prefix = Yealink SIP-T46G $FW_VER
phone_setting.product_name = SIP-T46G
phone_setting.login_note_text = Gigabit Color IP Phone SIP-T46G
account.X.sip_server.2.address = %NULL%
account.X.sip_server_host.legacy = 192.168.0.120
account.X.sip_server.1.address=192.168.0.120
account.X.label=Adam Smith
account.X.display_name=Adam Smith
account.X.auth_name=Adam CSTA
account.X.user_name = 201
account.X.enable = 0:
account.X.csta_number= 201
features.csta_control.enable = 1
NOTE:The administrator can edit 01234567ABCD-local.cfg file using your text editor of choice e.g. Notepad, Wordpad etc.
Important information when editing a "Local Configuration.cfg" file
- First Line is always required.
- Do not use the XML format.
- Required format XXXXX="Y".
- To comment out the line use "#".
- You can create a new file from scratch, with only the new settings that you want to add.
- The "X" (e.g. in "account.X.label") stands for an account number. Enter a digit between 1 to 16. Number of accounts varies from handset to handset. Contact your Yealink provider or access web user interface to find out the number of accounts on your handset.
- Last two lines are mandatory for any Yealink handset with the firmware older than v81.
Firmware v81 allows you to enable CSTA from the handset web interface.
Go to Features -> Remote Control.
- To enable CSTA control using configuration file enter 1 in features.csta_control.enable.
- The value specified in "account.X.csta_number" takes precedence over the value entered in "account.X.user_name".
- For more information on how to edit (or add more lines of code to) local configuration file please see"Yealink SIP-T2 Series T4 Series IP Phones Auto Provisioning Guide".
Parameters Description
| Parameter | Description |
|---|---|
| account.X.enable | It enables [1] or disables [0] the account X. |
| account.X.label | It configures the label to be displayed on the LCD screen for account X. |
| account.X.display_name | It configures the display name for account X. |
| account.X.auth_name | It configures the username for register authentication for account X on the uaCSTA Server. |
| account.X.user_name | Specifies the identity of the handset for registering on the uaCSTA server. |
| account.X.password | CSTA password must also be specified to match the value on the 'Telephone System' page (on the uaCSTA server). * |
| account.X.sip_server.1.address | It configures the IP address (or domain name) of the uaCSTA Server 1 for account X. |
| account.X.sip_server.1.port | It configures the port of the uaCSTA Server for account X. |
| account.X.csta_number | Specifies the identity of the handset for registering on the uaCSTA server. |
| features.csta_control.enable | To enable CSTA enter [1] to disable enter [0]. |
*UC Server builds above 3.2.0.18449 the server will no longer validate the uaCSTA password and this field can be left blank.
To import "Local Configuration" file via web interface:
- Go to Settings -> Configuration.
- Under the "Import CFG Configuration File" section, click on "Choose File" then browse to the location of "01234567ABCD-local.cfg" file and click on "Import".
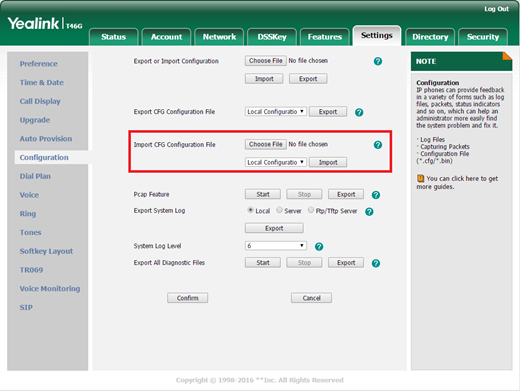
Important!The configurations in the imported "01234567ABCD-local.cfg" file will override the one in the existing local configuration file and will be saved to the phone flash and take effect immediately.

 Report this page