Mitel - TFTP Provisioning
Handset Provisioning via TFTP Server
This is a simple guide on how to enable uaCSTA on Mitel handset and Mondago assumes no liability resulting from any omission or inaccuracies in this document.
Important!uaCSTA support is available for the Mitel phones starting with Release TBC. Presently uaCSTA support is only available in "beta" firmware.
Mitel (Aastra):Model 6869i-Firmware 4.3.0.39
The following procedure describes how to enable uaCSTA support on Mitel 6869i. Once the handset has been successfully provisioned on the platform, the administrator will have to create .cfg* configuration file such as MAC.cfg or startup.cfg that contains the following settings for uaCSTA. In this firmware there is no user interface to configure uaCSTA. All settings are made in the text configuration files.
Example of a "startup.cfg" configuration file
CSTA: 1
CSTA proxy:192.168.0.120
CSTA port: 6060
CSTA username: 201
CSTA password: 12345
Command Definition
| Command | Definition (uaCSTA Server) |
|---|---|
| CSTA | By defining 'CSTA' parameter as 1 you will enable the uaCSTA on the Mitel handset. |
| CSTA proxy | Specifies the IP address or FQDN of the proxy server for the uaCSTA server. |
| CSTA port | CSTA port must be specified on the "Telephone System" page (on the uaCSTA server). We recommend to use port 6060 to establish connection between the handset and the uaCSTA server. |
| CSTA username | Specifies the identity of the handset for registering on the uaCSTA server. |
| CSTA password | CSTA password must also be specified to match the value on the 'Telephone System' page (on the uaCSTA server). ** |
* Note:You can use your text editor of choice e.g. Notepad, Wordpad etc. to create .cfg files. In releases previous to 4.0.0 SP1, the "startup.cfg" file was named "aastra.cfg".
**UC Server builds above 3.2.0.18449 the server will no longer validate the uaCSTA password and this field can be left blank.
TFTP Server
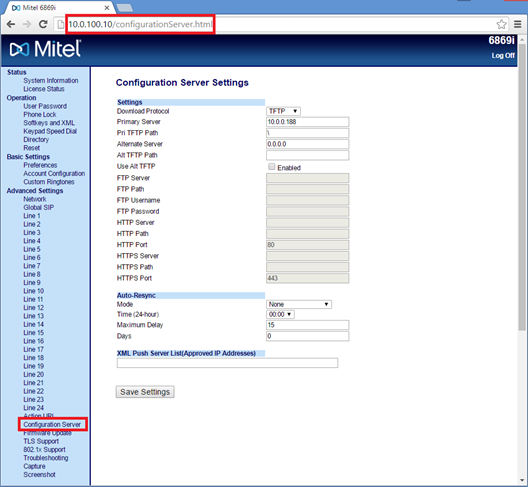
TFTP server is required to upload configuration file. Copy "startup.cfg" to the root directory of the TFTP server. Navigate on your web browser to "http://Handset's IP Address/configurationServer.html" e.g. http://10.0.100.10/configurationServer.html and enter administrator credentials and provide the following information:
- Download Protocol:Select TFTP.
- Primary Server:Enter the IP Address of your TFTP server.
- Primary TFTP Path:Provide the file path to the startup.cfg file.
*NOTE:Please contact your Mitel distributor to get administrator credentials.
Example

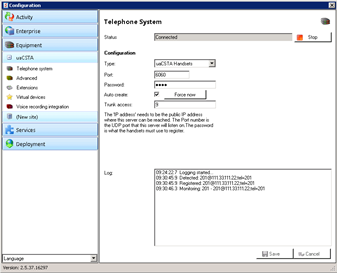
Click "Save Setting" to import the new configuration file. Once the file has been imported, the phone should automatically reboot itself (if it does not, please reboot it manually). If the new configurations have been successfully applied, administrator should be able to see on the uaCSTA Server log a new Mitel device being detected and registered.
Example

Scenario with a Multi-tenanted Server
It is common for uaCSTA handsets to be used in a multi-tenant environment. As such Mondago have designed the server software to allow auto-creation and auto-allocation of the handsets to a suitable tenant on the server. To fully use this functionality, "Tenant licenses" must be present on the server. If the tenant ID is not explicitly specified on the PBX platform and is not included within the handset configuration file, then in order to assign an extension to a specific tenant an administrator will have to edit this line of code:
CSTA username:"TENANTNAME*EXTENSION"
Example of a "startup.cfg" configuration file in multi-tenanted scenario
CSTA: 1
CSTA proxy:192.168.0.120
CSTA port: 6060
CSTA username:"AcmeLab1*201"
CSTA password: 12345
Command Definition
| Command | Definition (uaCSTA Server) |
|---|---|
| CSTA username | Provide a CSTA username, assign CSTA user to a tenant, create a new tenant or assign CSTA user to it. |
When creating and importing a new "startup.cfg" file in the multi-tenanted environment, the principles are exactly the same as per example above.
Note:If the tenant already exists on the uaCSTA server then the extension number/name will be assigned against this tenant. If however the tenant does not exist, this command will trigger the uaCSTA server to create a new tenant which will bear the name specified in the command above. In this example the tenant ID would be "AcmeLab1".

 Report this page